Spider Mobile

So I know I’ve been pretty m.i.a. for a while.  The truth is that I just didn’t feel like blogging really.  I’ve been focusing on my art and other things for the past year. (Oh yeah I got married this summer! More on that later.)  I just didn’t want my blog to become a chore that I dreaded, so if I didn’t have anything to blog about I didn’t.  I’m ready to post more here and there and I actually do have some stuff to share.  So, in honor or my favorite holiday Halloween I present to you:

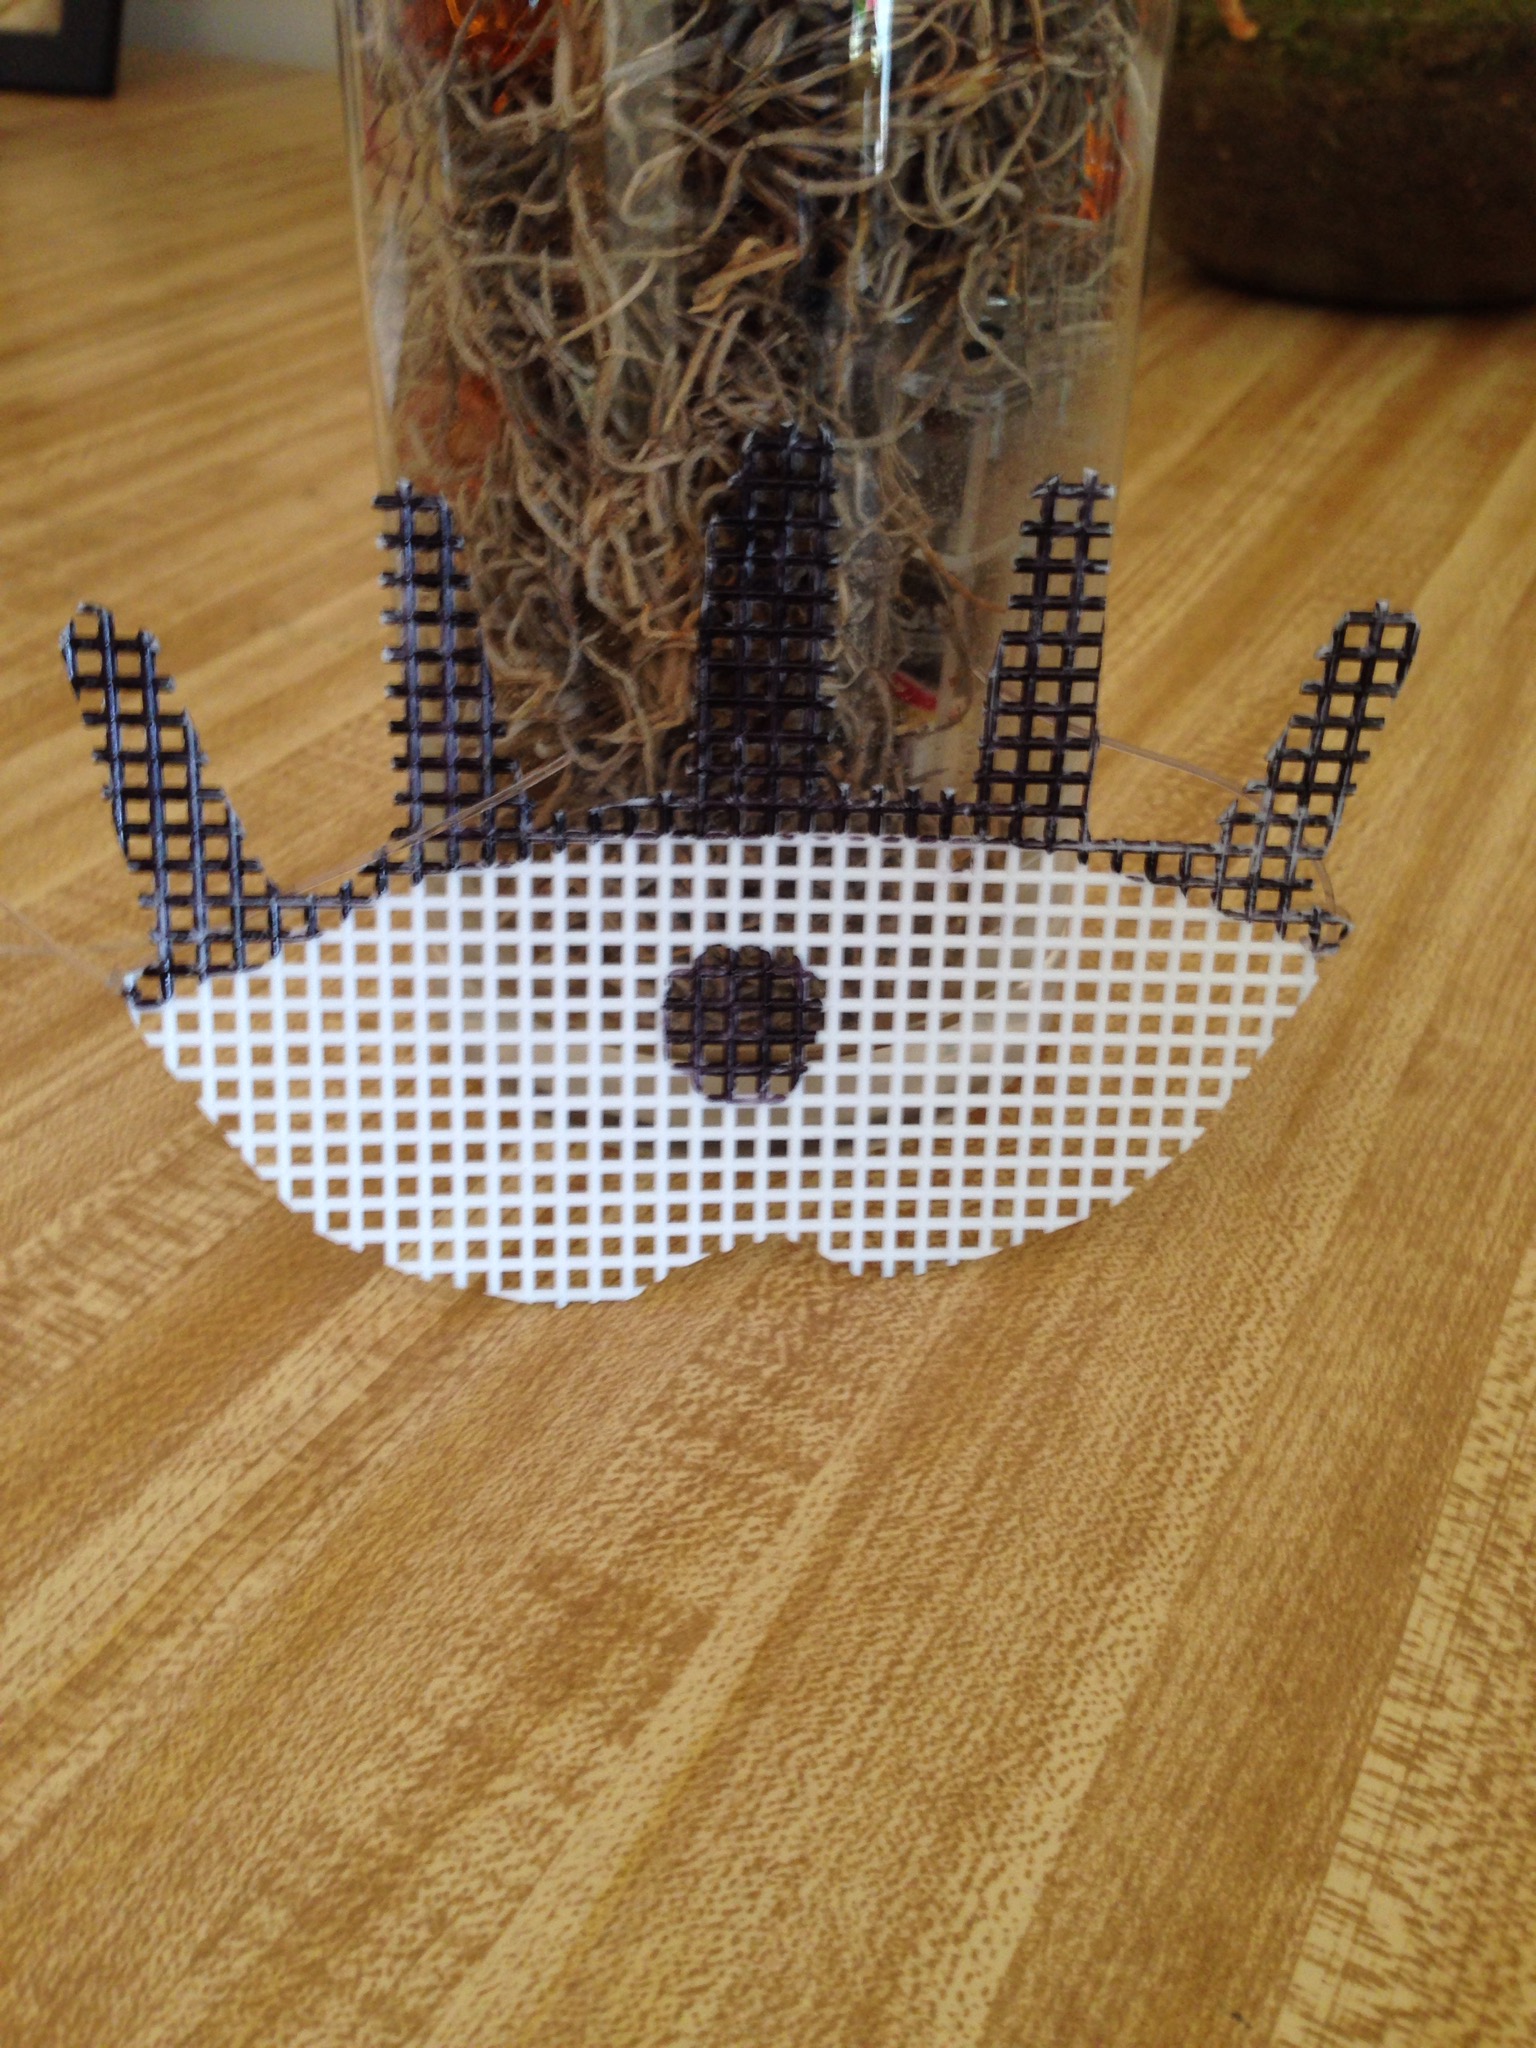
Duh duh duh! A spider Mobile.  I actually made this last year after Halloween.  I bought the spiders and mobile for way cheap the day after Halloween and made it.  So this year is the first Halloween I’ve put it up.  I got the idea from Better Homes and Gardens magazine’s Halloween Tricks and Treats magazine 2015. I had wanted to make it back in 2015 but it took me forever to find some plastic spiders that weren’t attached to rings.  Last year I finally did so here you have it.

You’ll need:

  • 200 or more plastic spiders
  • a wire rimmed spider web
  • fishing line
  • a needle or something sharp to pierce spider butts
  • optional- I tied little seed beads to the end of my strings for a little weight so they hang straight

Its pretty easy just pierce a whole in the abdomens of all the spiders and make different length strings with them spacing them about 5-6″ apart and tying a knot in the fishing line under each spider.  I finished each string with a clear seed bead under the last spider for a little weight.

After you have your strings tie them all on the spider web strands.  You might want to do this as you finish the strings to so they are out of the way and don’t get tangles up.

The last step is to tie string onto four sides of the web so that it hangs horizontally from the ceiling.  (most are made to hang vertically)

And there you have it!  Perfect for a Halloween party or I guess all year round if you really like spiders, I don’t judge!

On a side note, when storing this I put each string of spiders in it’s own individual baggie so the strings don’t get tangled beyond saving.  Next year you will really appreciate it.

Enjoy!

img_3719


Advertisement

Crockpot Applesauce

dsc_0080

Hey, have you missed me? I’ve been trying to get the motivation to write a post, even thought it really doesn’t take that much time at all.  Sometimes when I  have a million other little things to do, I put things off even the things I enjoy doing.  Since I graduated in July, I have been busy wedding planning, job searching and taking care of some sick family members in Indiana, so needless to say I’ve been busy.

I’m posting this recipe for multiple reasons.  One, its super easy, two its healthy, and three it’s so easy I can’t believe I’ve never made it before!

I love anything that I can throw in a crockpot while I do other things.  Bonus: it smells amazing!

Here is what you need:

  • 6-8 Apples, diced (with or without skins)
  • 1/2 cup water
  • 1 tsp. cinnamon

Add all ingredients to the crockpot and cook on high for 2 hours or low for 4 hours.  I chose to leave the skins on my apples for fiber, but if you do this I would recommend blending it in small portions in a blender.  If not, and especially if you like it chunky like I do I would just use a hand masher.  I did this and while it was good, the skins were a little much.

dsc_0069

I got the original recipe from The Healthy Maven Blog and tweaked it a bit to fit my preferences and crockpot size.  Homemade applesauce is tastier than store bought and so cheap and easy to make, it would be a great healthy snack for kids.  I love it because its a sweet snack with no added sugar.

Enjoy!

img_3719


Hello Again!

Hello remember me!?  I know it’s been a looooong time since I’ve posted anything and the reason was because I was going to school full time and working on my installation art and this hasn’t left me too much time to craft or bake or anything like that.  Not to worry though, I am almost done with school and have some awesome projects lined up to try and post about!!

If you want to see what I’ve been up to in my art I just made a new website that you can check out at jennamishler.com and let me know what you think!

I might not always get around to posting as much as I would like to but rest assured I will always get around to posting projects eventually.

Cheers,

Jenna

Christmas DIY Roundup

Hey all, remember me? Ah I just realized I haven’t posted since October!  The reason being grad school is keeping me super busy.  But even though I have been working on my art more than crafts I still want to spread some holiday cheer so I found a couple of my favorite diy’s I posted last Christmas time for a little refresher.

First there are these super fun and easy to make Snow Globes

DSC_0076


Next the ever amazing Dyed Bottle Brush Trees and Wreath

DSC_0015

And last but not least…Clay Paw Print Ornaments

DSC_0023

I hope these give you some inspiration and fun and I’d love to see what other Christmas diy’s you come up with so show me on Instagram with #peppermintsandhoneybees.  Also I have an exciting announcement to make soon so stay tuned!!!

IMG_3719

My Halloween Costume

I hope you had a spooky good Halloween! It was super cold here and even snowed a bit but Saturday night I dressed up and went to a party so I thought I’d share my costume, homemade as usual!

IMG_4563.JPG
I went as Leela from the cartoon Futurama; see here for those not familiar…

IMG_4583.PNG

She’s a Cyclopes who is the captain of a spaceship and an all around BA.
Here’s how I made her eye. I wanted to make sure I could still see so I used some of that plastic canvas people use to make needlepoint art with. I traced it, cut it out and colored the lashes and pupil in with a sharpie.

I bought the purple wig and the rest was put together with stuff I already had.

IMG_4581.JPG>

I went for something simple this year but was very pleased with how it turned out. What were you for Halloween?

Here’s one more withy sister. 😀

IMG_4566.JPG

IMG_3719.JPG

Table and Chairs Refresh

DSC_0260

I’ve never really liked this table and chairs since they look like and probably are from the 90’s.  Ben had gotten them used before we lived together and were definitely outdated and showing their age.  We were going to buy a new dining room set but couldn’t find one (or a price) that we like. I decided that since they are still in pretty good shape we could keep them a little longer and I’d be happier with them if they looked a little more modern and a little pop of color can go a long way!  I painted everything that was painted white and left the wood showing.  I used satin latex paint with a semi-gloss polycyclic over it to seal it.  It did take about four coats of the blue though since I was painting  such a dark color over the white.  It was a nice summer project and I’m pretty pleased with the way it turned out!

20140720-181325-65605918.jpg

Before

After, plus my Birthday Flowers! :)

After, plus my Birthday Flowers! 🙂  Plus find the cat for bonus points…

DSC_0267

name


Dip Dye Dress

DSC_0215
DSC_0213  DSC_0227 DSC_0224

Hello all! I have been wanting to be able to post this all summer, but haven’t been able to because it’s taken me all summer to get it right.  Arg! I think I finally got it to how I like it.  It’s not quite as I had pictured in my head but oh well, that just goes with the territory of making things sometimes.  I bought this awesome gray dress at Plato’s Closet, one of my favorite used clothing stores and wanted to spice it up a little bit.

I had originally planned on bleaching the bottom 1/3 and then dip dye the very bottom either purple or blue, so that it would go gray, a bleached cream color, and the purple on the bottom, but after bleaching didn’t get it completely bleached (and I tried a couple times) I tried dying with Rit.  Well the color didn’t take so yeah…  I’m pretty sure all of my problems were due to the material of the dress, it’s mostly polyester and rayon. So moral of the story is check the fabric before dying, lesson learned!

I did how ever get it to a color I like by dying the bleached part with a mix of beet juice and mulberry juice.  I love when the natural way is the best way!  So here is my final result.  Not what I had first pictured, but I still love this dress.  Plus it has the built in bra pads so woohoo!

name

I need some help deciding!

Hey everyone! Happy Thursday, it’s most the weekend and I’m so excited! I have a wedding to go to in Indianapolis so it’ll be one of those busy in the car most of the time weekends.

So I recently did an at home try on, ok maybe two at home try ons from Rivet & Sway. I don’t know if you’ve heard of them, but they make prescription glasses and sunglasses designed especially for women with smaller faces. I’ve always had trouble getting my glasses to stay up and then you get the dreaded headache; same as the headband headache. Also they let you try on five different frames at home for free which is what got me in this dilemma.

I need new glasses but can’t decide which pair to pick so I am in need of some advice. So what do you think?

I’m thinking of picking one of these two.

20140515-144027.jpg

Here are the others

20140515-144258.jpg

Agh! To many choices! Let me know what you think. Also check Rivet & Sway out. They have the cutest glasses around.

Jenna ❤

Stuff I Made: A Skirt

Image

I haven’t really had much time to work on anything new lately and was sick all of last weekend, (boo!) but I’m feeling much better now have lots of new projects planned!  I thought I’d show off this skirt I made a few years ago from old kitchen curtains.  I found the curtains at an antique store I used to frequent when I lived in Fort Wayne.  I loved how kitschy they were but didn’t have any windows they would fit on and they didn’t really match my decor so I made them into a skirt.   Let me know if you’ve ever made anything found into something wearable, I’d love to see your projects.  Have a great rest of the weekend and hopefully the weather stays nice for everyone!

-Jenna

Image

Image

Image

Ben thought he was being funny in this one!