Make a Camera Strap Cover

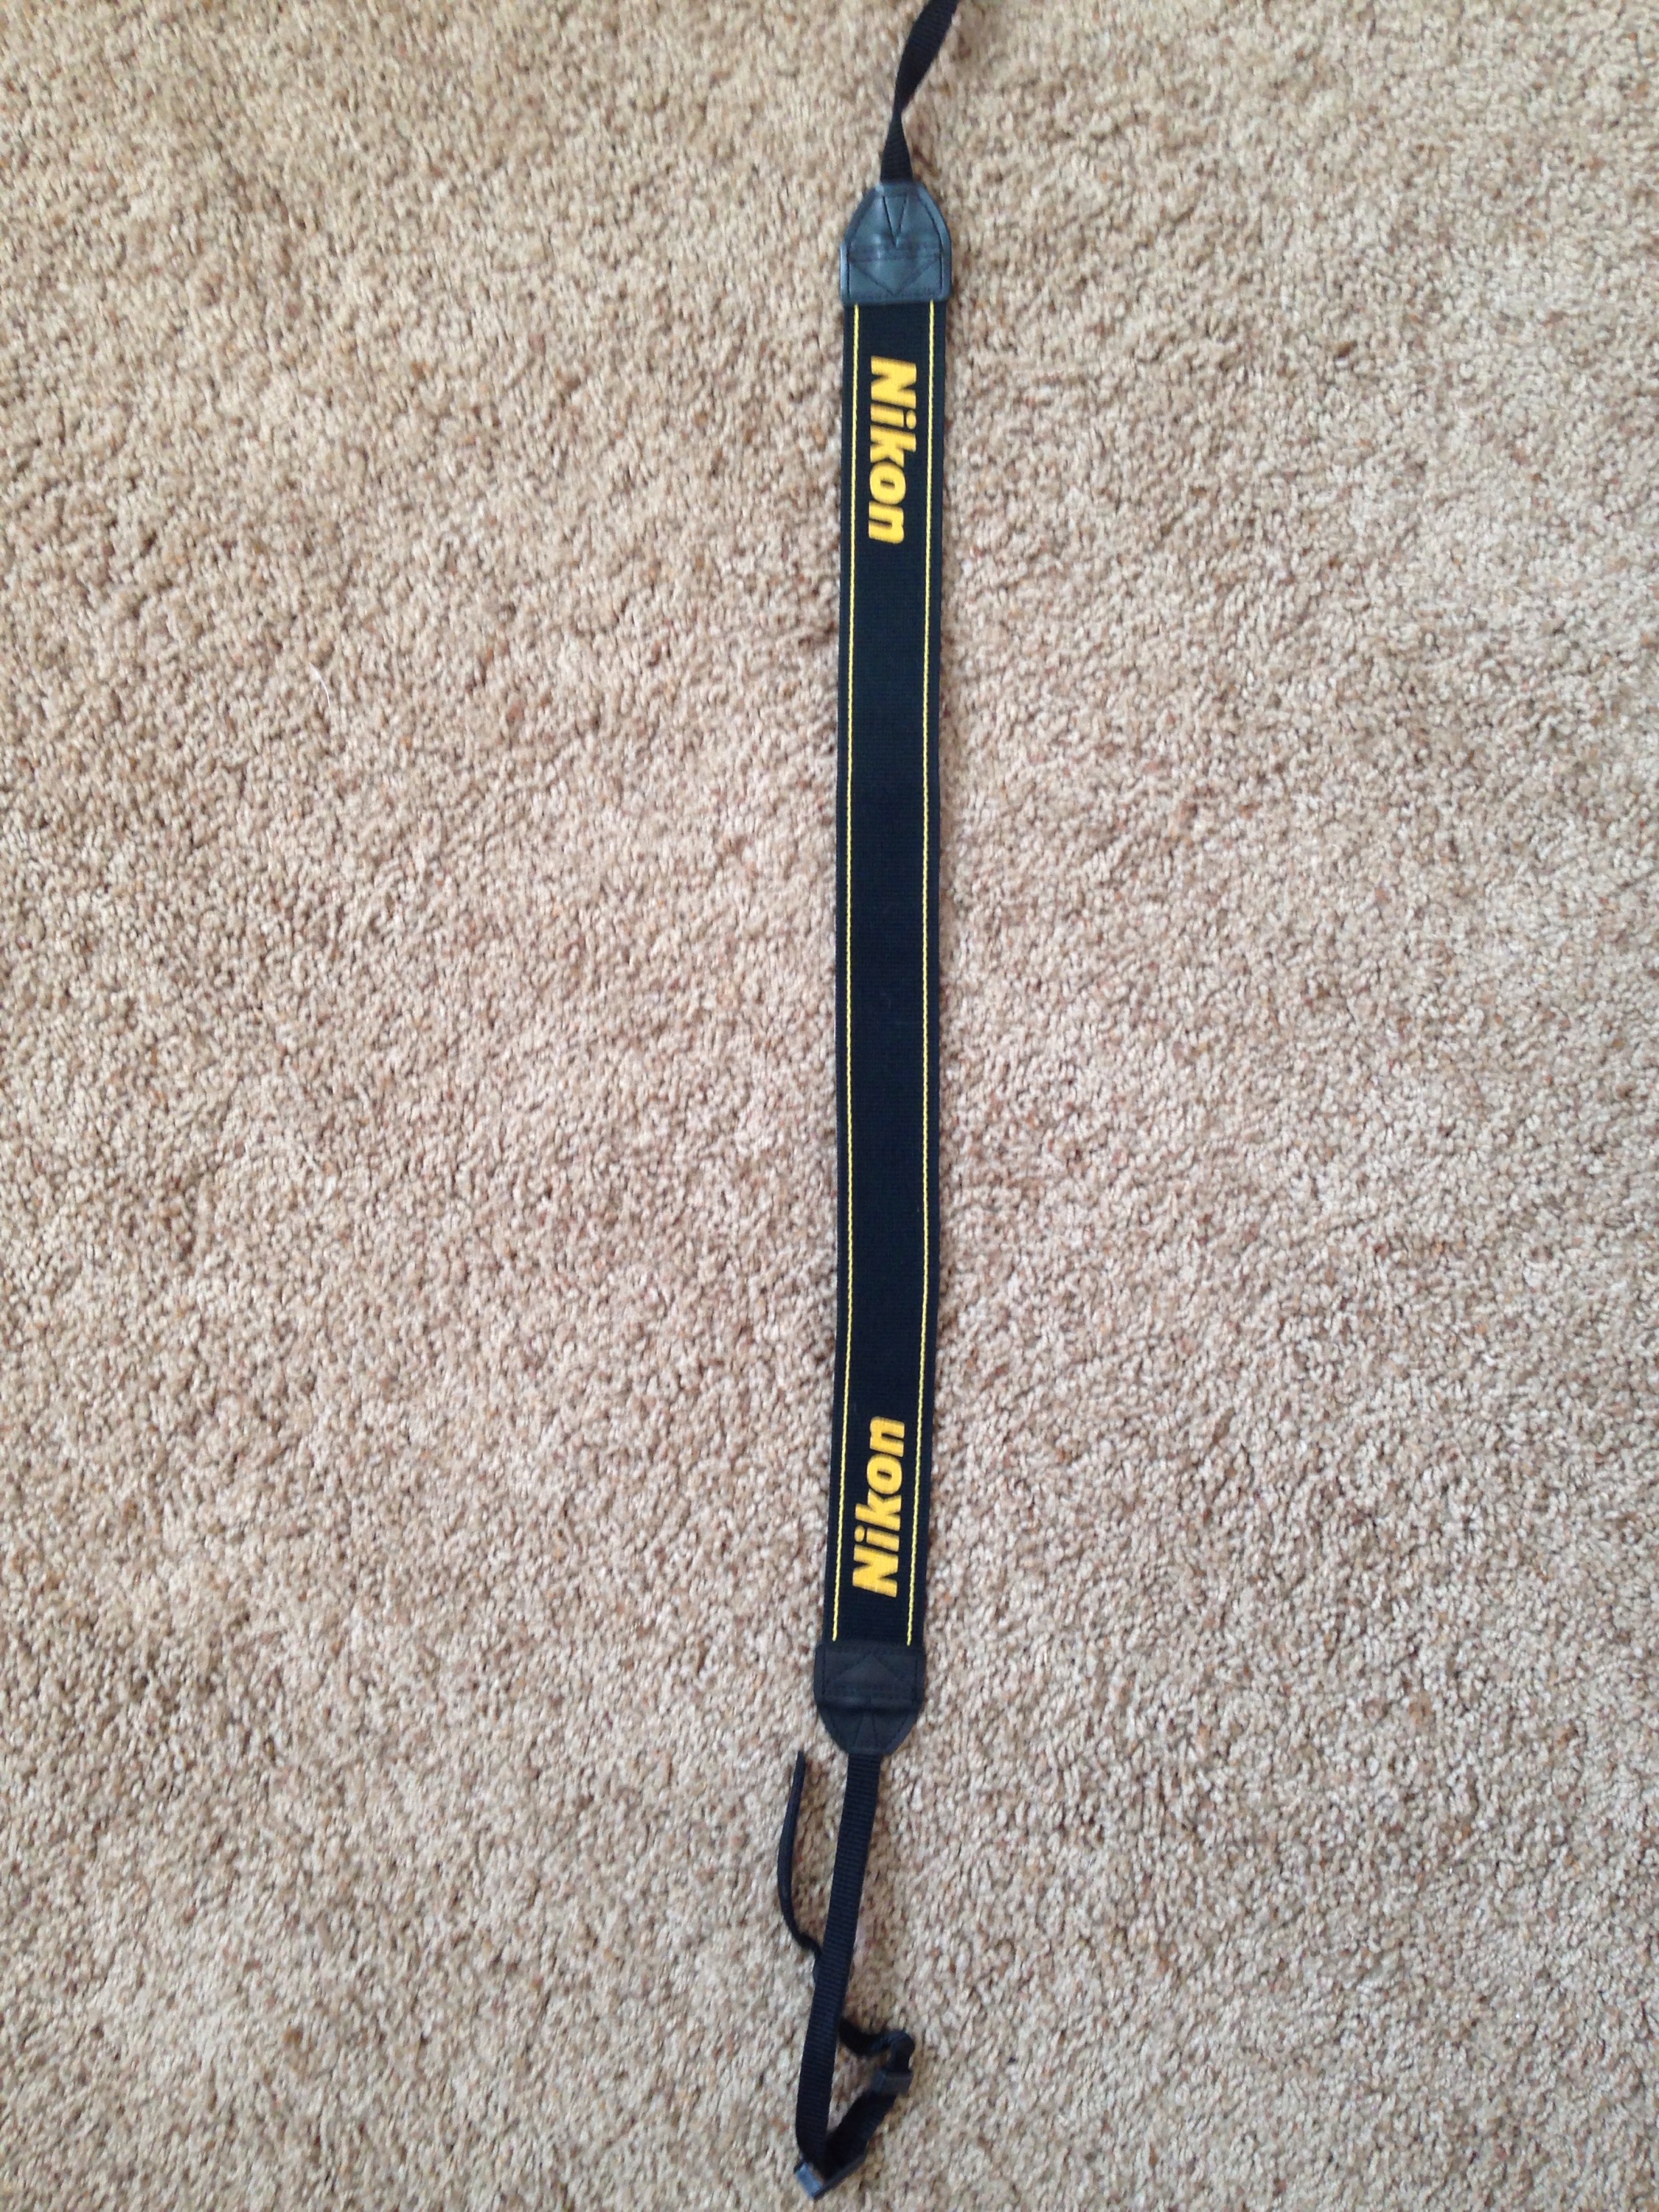
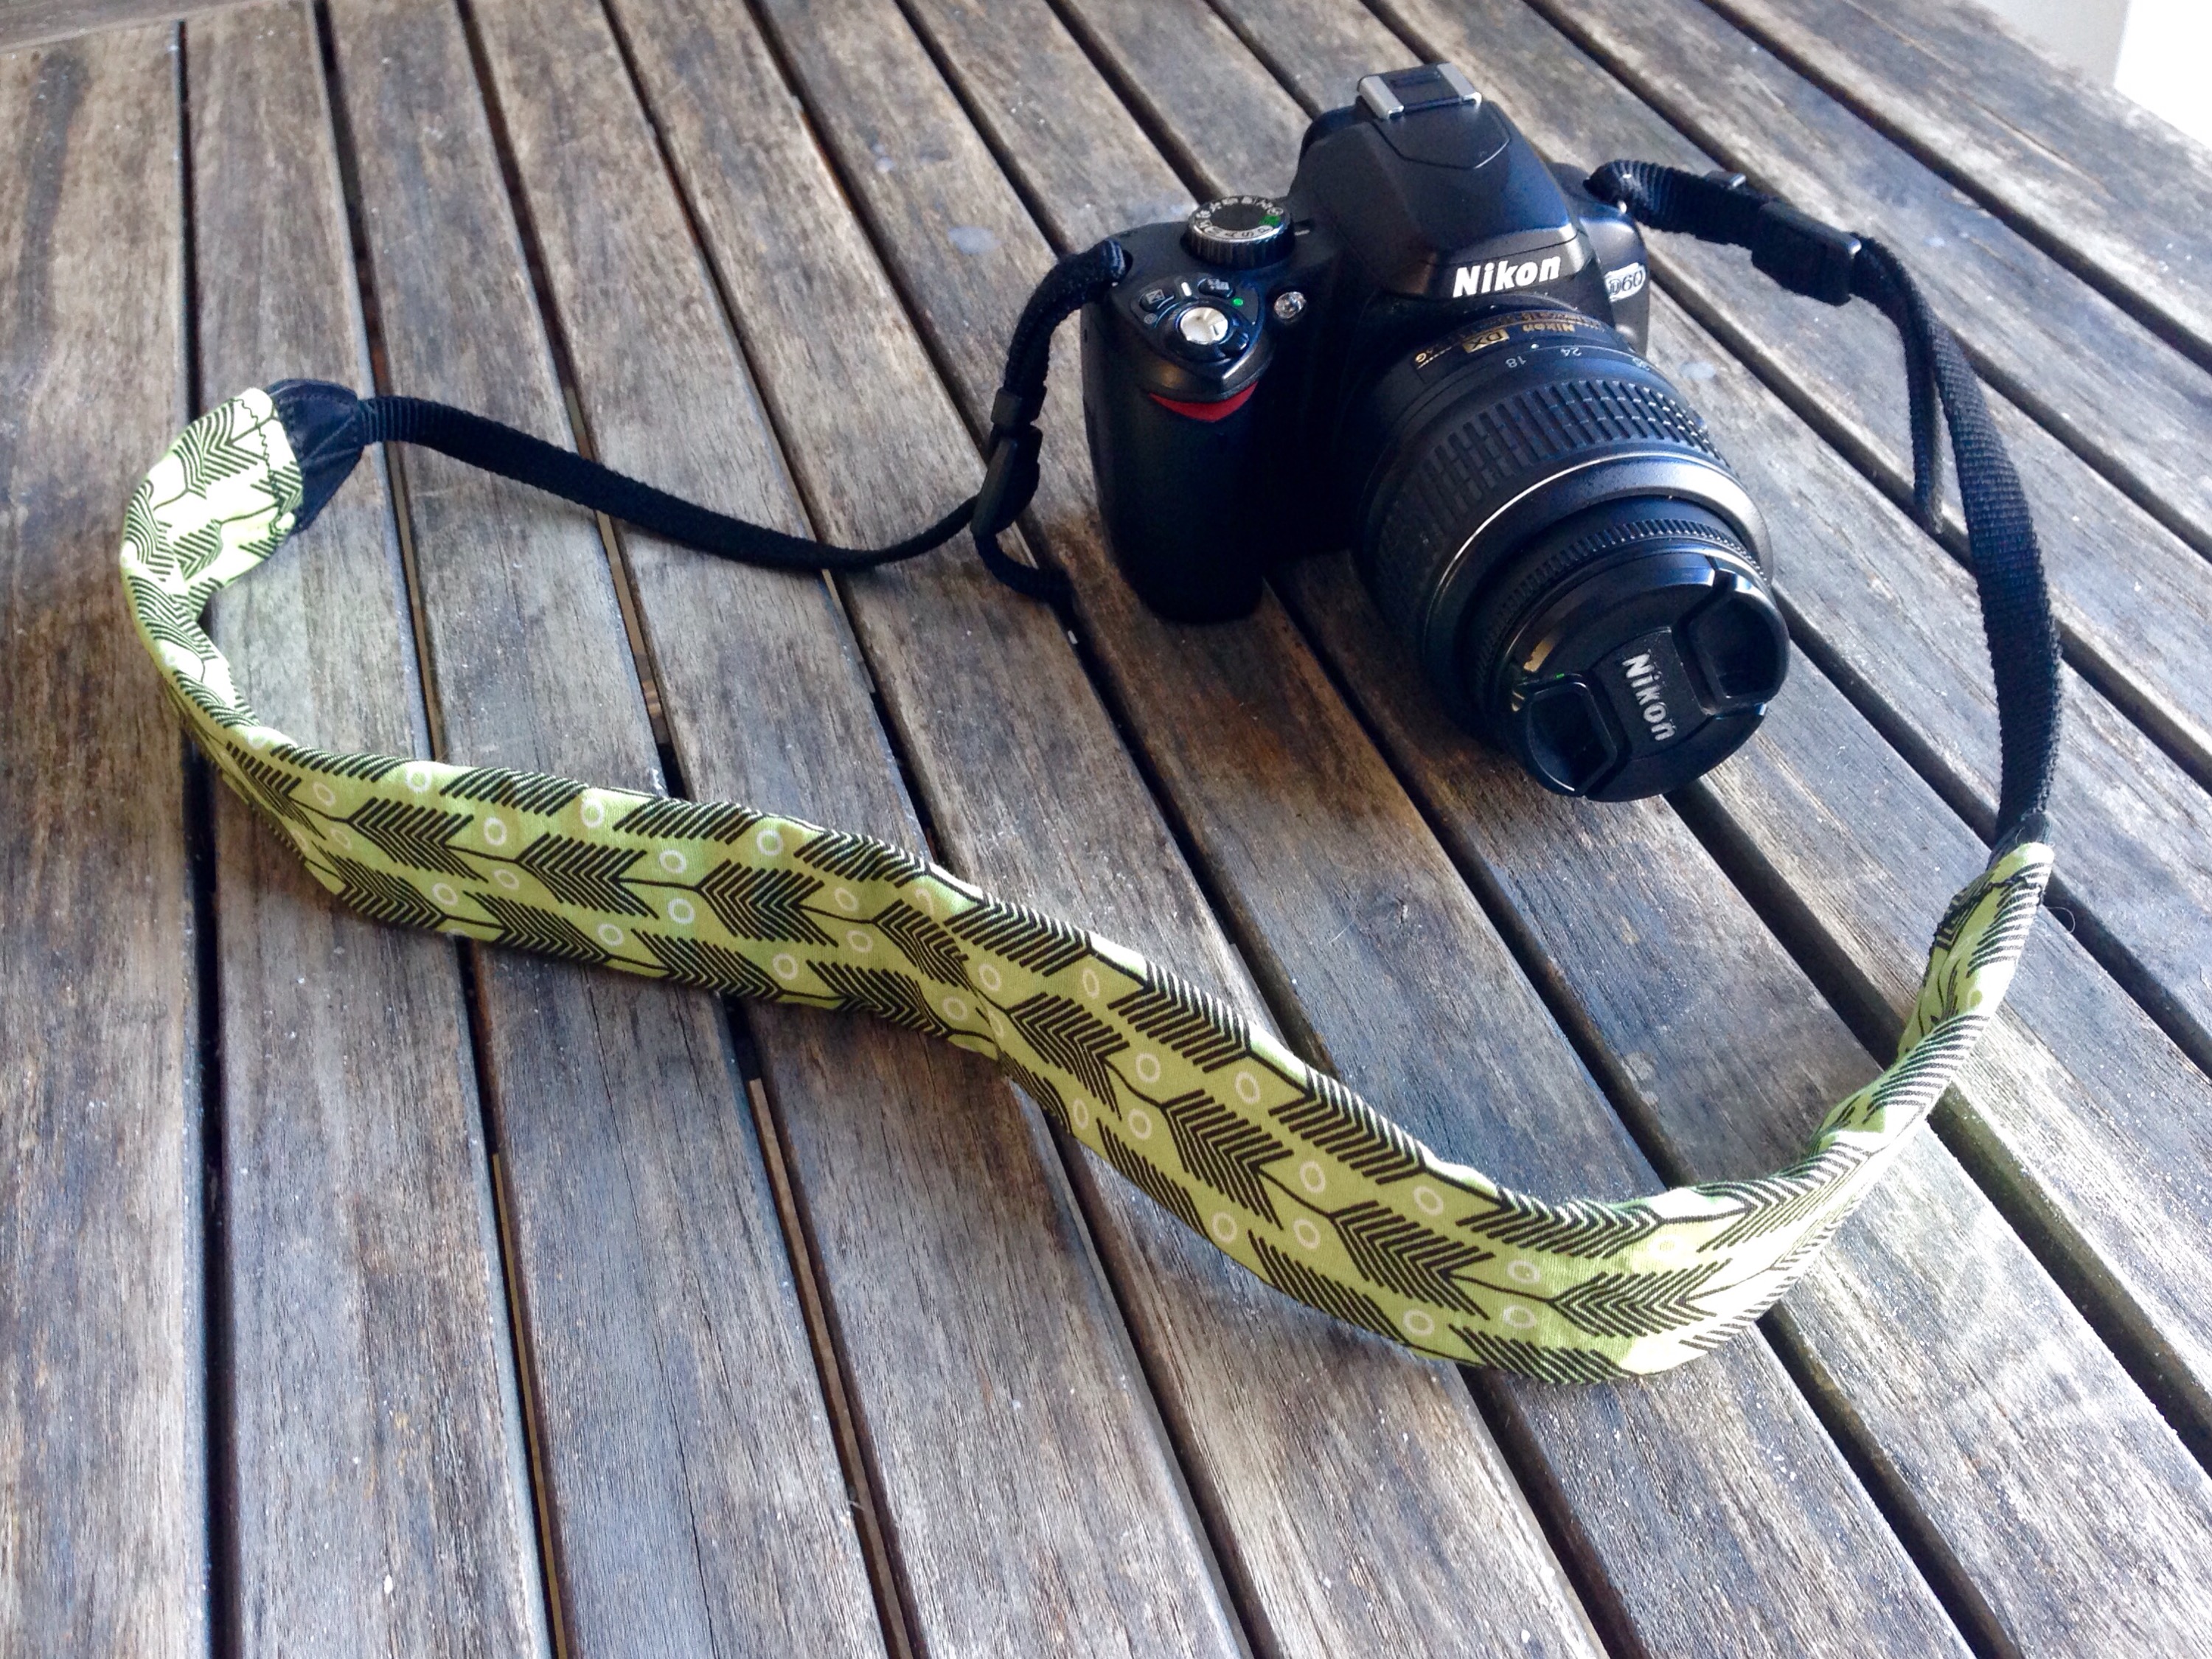
I’ve been wanting to make a cover for the strap of my camera so I don’t look like a tourist with the factory strap.  I had some time since we got all that snow so I sat down and made one, which didn’t take much time at all!  If you make one you’ll have to measure out your strap.  Mine is a Nikon and it was 20 1/2″ long and 1 1/2 ” wide.  I cut the fabric out 22″ long so I could fold it over twice on each side and sew a 1/4″ hem.  I made it 4″ wide so I could fold in in half and sew the seam.  For whatever reason my machine would only sew a zigzag seam so yeah…, oh well if that’s the worst that happened!  After everything is sewn use a safety pin to turn it right side out by pining an end and running it through to the other side.  I also used a safety pin on the end of my camera strap to feed it through the cover.  I made mine fit snug on the ends so that it wont ride up when I’m using it, but you can make yours however you want!

I had some fabric left from my kimono that I liked so I used that and then made another one out of some peppermint fabric that a friend had given me.  I was saving it for the perfect project but I tend to do this with things and then they never get used!  I had originally planed to make a pocket for my lens cap, but my cap is quite a bit wider than the strap so it would have to really stick out.  Maybe I’ll add one later, we’ll see, but again up to you!

IMG_3719

IMG_5211

IMG_5213

IMG_5214

IMG_5215

IMG_5220

IMG_5227

IMG_5255

Advertisement

Holiday Gifts

Hello, I hope you had a Merry Christmas and are resting up with family and friends! I know Christmas is over, but I couldn’t post any of the stuff I made as gifts until I gave them out, but you could still make them for yourself or birthdays, or just wait till next year.  So here we have wood burned bamboo spoons, hand stamped cork coasters, and yes, those are the marble clay dishes from A Beautiful Mess! DSC_0056IMG_3719

Homeade Leave In Conditioner

If you have curly fine hair like I do or if you just want a little shine and added protection to your hair you probably use some spray in conditioner after you wash your hair.  I used to buy it until I figured out an easy homemade recipe that is super cheap to make!

All you need is:

  • An empty spray bottle
  • any kind of conditioner (I like to use the hotel samples I pick up)
  • Aloe Vera juice
  • Water

DSC_0095

I don’t really measure it out since it depends on the size of the bottle but I fill the bottle up about an inch with conditioner and then fill the bottle half way up with the aloe vera juice.  I fill the rest up with water and then shake it up.  It’s that easy!  Use after you get out of the bath or shower and before you style your hair.  I like to use a generous amount on my hair, and I can with this cheap easy recipe!

IMG_3719

DIY Running Belt


DSC_0385Happy Saturday!  I finally got my sewing machine working so I’ve been trying to finish a bunch of projects I attempted to start and haven’t been able to do.  The first one I finished was this running belt to hold phone, keys, music, etc.

They sell these handy little accessories at stores but they’re pretty pricy and for what it is, I figured I could make one for quite a bit less.  They just have an opening or two where you stick your stuff and them flip them over to hold everything in place.  Now I originally wanted to add a zipper and fold over elastic to the edges but after the issues with my sewing machine I decided to keep it simple and it still works great.  Feel free to make yours more jazzy though!

DSC_0381DSC_0382

First I bought 1/4 a yard of a nylon spandex mixed fabric from Joanne Fabric.  I folded it over and sewed it together leaving an opening for the pocket.  I then cut slits were the opening for the pocket were and folded them down and sewed.  I them flipped the belt right side out and with the pocket facing out I sewed the ends together.  When doing this step be sure to get it nice and tight.  The fabric stretches so I had to make mine quite a bit smaller than I thought I would need to.  Remember it’ll be bouncing around when you run so you don’t want it sliding or falling down.  The fabric was a little hard to sew because it is slippery so definitely pin it.  Then cut the extra, fill it up and flip it over so the opening is facing in.  Then you’re ready to run. 😉  I’ve been trying to get up to 5 miles and I’m half way there so this should help me get there.  Let me know how you use yours! 

20140803-193534-70534607.jpg

Table and Chairs Refresh

DSC_0260

I’ve never really liked this table and chairs since they look like and probably are from the 90’s.  Ben had gotten them used before we lived together and were definitely outdated and showing their age.  We were going to buy a new dining room set but couldn’t find one (or a price) that we like. I decided that since they are still in pretty good shape we could keep them a little longer and I’d be happier with them if they looked a little more modern and a little pop of color can go a long way!  I painted everything that was painted white and left the wood showing.  I used satin latex paint with a semi-gloss polycyclic over it to seal it.  It did take about four coats of the blue though since I was painting  such a dark color over the white.  It was a nice summer project and I’m pretty pleased with the way it turned out!

20140720-181325-65605918.jpg

Before

After, plus my Birthday Flowers! :)

After, plus my Birthday Flowers! 🙂  Plus find the cat for bonus points…

DSC_0267

name


DIY Photo Phone Case

DSC_0279

Hello everyone, I have been busy trying to get things done so I can enjoy the warm weather that is finally starting to arrive soon!  I haven’t really made anything in about a week but I thought someone might find this diy handy.

This one’s pretty simple!  Buy a clear case for your phone.  I got this one on Amazon for about $1.99.  Print out a 4×6 photo, of whatever, and trace the phone cover and camera hole and cut.  I have an Iphone so depending on your phone you might need a bigger sized picture so be sure to measure first.  I used an exacto knife to make sure I got a nice clean line and voila! Try to use a photo that will work well with your case since it is long and skinny.  This is perfect for those of you who like to change your case often and don’t want to spend a small fortune on new cases every time.

20140406-131034.jpg

DSC_0281


Ombre Dyed Curtains

DSC_0192

As I mentioned earlier I am all about dyeing so when I saw some thing similar to this on pinterest from a blog called http://www.vitaminihandmade.com/.  I thought I would give it a try to add some color to my boring white living room. I went with sunshine orange in the Rit dye and bought some inexpensive white curtains at IKEA. I didn’t want to spend a lot in case it didn’t work out.

I got the curtains wet in my double kitchen sink and filled one side up with hot water and the dye. I kept both curtains together at the top to make sure the dye pattern was the same on both. I wanted the top to have a little color so i dipped the whole curtains in for a few seconds and then removed all but about a foot, leaving the rest in the empty sink. I soaked it for about five minutes and gradually kept putting more and more in for about half way up.


After I had what looked to be good I rinsed the curtains in cold water and washed and dried them in my washer and dryer. They were a little lighter than I had hoped they would turn out so I bought one more box of Rit, just to do the bottoms. After this time I liked the way it looked. I guess it just depends on the look you are going for and the color, so you may or may not need two boxes of dye. I’m pretty happy with the way they turned out!

DSC_0202


DSC_0197


curtains

Don’t throw away those old towels

If you’re like most people you have your nice towels and your old towels that you use for dirty stuff like dying your hair and washing the dog, and I am no different, but I have been making my “good” towels last a little longer recently because well, I have better things to spend my money on, like shoes!  I have pimples and use a face wash with benzyl peroxide, which as you may know bleaches any fabric it touches so I get nice bleach stained towels along with the general fading that goes along with washing towels. Fun stuff I know!

Image

Instead of buying new towels all the time I started dyeing them with Rit dye.  Rit is the kind that comes in the box of powder or the little bottle of liquid.  It can be found at most craft and sewing stores, and I think some stores like Wal-Mart carry it. I usually buy the powder because it’s cheaper, usually around $2-3. 

I just pour it in a sink full of hot water and let my towels soak for about 15 min. I always do my dyeing in my kitchen sink so I can use both sinks, one for dyeing and one for rinsing.  Oh and always wear gloves when dyeing, or you will have dyed hands! After that I rinse it our and wash the towels in the washing machine on normal settings.  I use black because all of my hand towels are black, it’s easy to match to and easy to dye.  I would recommend dyeing  your towels a dark color because it is easier to dye.  Hopefully this saves someone from having to buy new towels!

My next post will be about the curtains I dyed.  I’m a big fan of self dyeing if you can’t tell.  I just started using it about a year ago and wish I would have started sooner.  I can’t tell you how many pairs of jeans I’ve redyed!