Dried Wedding Flower Ornament

Happy Holidays everyone! I have a really easy but special DIY for this Season. And of course they don’t have to be from a wedding bouquet but these are from my wedding which was last June.

I wanted to preserve a bit of my flowers but I don’t want them in a shadow box because I had hydrangeas and things with tiny parts that would just fall apart anyway.

I don’t know how many years they will keep but they should last at least a few years.

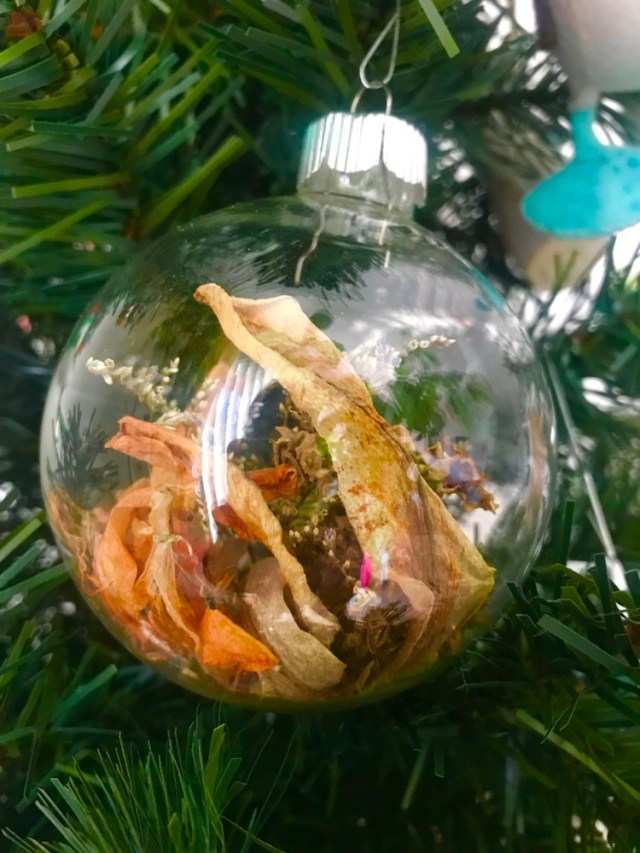
All you need is some clear glass ornaments and dried petals and leaves. Be careful when placing everything in the ornaments because they are very thin glass and you don’t want it to break and cut you. It’s that easy! If you don’t celebrate Christmas and/or have a tree they would look great handing from ribbon in a window or from a shelf also.

I added some of my wedding pictures also, since I realized I never shared them on here last summer.

Have an amazing holiday season!

Advertisement

Stapless to Halter Dress DIY

DSC_0324

Hello,

I’ve been starting to get a little sad now that summer is heading towards an end but I’m also starting to get into the fall mindset and have started wearing more olive greens and burn oranges now. 

I recently found this dress I really really wanted two summers ago from Pacsun.  I didn’t buy it at the time because it was a little more than I was wanting to spent so I let it go.  On my most recent trip to Plato’s Closet though I found it on the sale rack for 50% off!  the only problem was that it was an XL and I am usually a small or medium.  it also had a hole by the zipper and a few of the seams were starting to come apart.

  I figured since it was so cheap I could try to fix it, so I made it into a small by sewing the side seams smaller and hand stitched the holes back.  I sewed out the zipper which really wasn’t a problem on this dress because the back was stretchy so I’m still able to get it on without a zipper.  After I was done I decided that I kinda wanted it to have straps so I wasn’t pulling it up all day. (I’m sure you small chested girls know what I’m talking about!)  I also didn’t want to have to wear a strapless bra with it, again the whole pulling it up thing!

steps

Since it’s the end of summer I was able to find this black bikini top at Old Navy on sale for $4.95 and I hand sewed it into the front of  the dress for a built in bra plus halter straps, pretty clever I think. 😉 I machine sewed the straps to the top so they would be secure and hand stitched the cups in so that the stitching wouldn’t show through the front.  Also I’ve been having sewing machine issues, which are very frustrating and angering sooo yeah….I’ve been hand-stitching what I can.   But I’m pretty happy with the result. 🙂

DSC_0344DSC_0327DSC_0330

I also got this green shirt at Plato's Closet for $2.50! I thought they looked nice together

I also got this green shirt at Plato’s Closet for $2.50! I thought they looked nice together

DSC_0350

20140803-193534-70534607.jpg

Sesame Soy Kale Chips

If you’re like me you love anything sweet to snack on but sometimes something salty and crunchy is in order. I made these kale chips yesterday and they are almost already gone! They’re super easy to make and healthier than most salty snacks!
20140730-121100-43860698.jpg

You will need:
•a gallon sized ziplock bag
•one bunch of kale. Must be cleaned dried and removed from the stems
•soy sauce
•sesame seeds
•garlic (optional)

Begin by cleaning kale and ripping it up in sections about an in ch or two wide. Lay it out to dry as I did here.

20140730-121741-44261952.jpg

Next add 1 tablespoon olive oil to the bag with 1 1/2 tablespoons soy sauce and 2 tablespoons sesame seeds. I added about 1/2 tablespoon of minced garlic to mine as well.

Add the kale and seal with air in the bag. Then shake until it is all coated. Next open the bag and let the air out, close it and work the mixture in so it is evenly coated throughout the kale.

20140730-122203-44523391.jpg

Spread the kale out onto a lightly sprayed baking sheet or pan and bake at 300 degrees Fahrenheit for 30 minutes or until it’s crispy.

20140730-122415-44655173.jpg

Then enjoy! I should warn you they are addicting. 😉

For more flavors I found a list at Refinery29

20140730-122728-44848986.jpg


20140730-173135-63095667.jpg

My trash finds of the summer

DSC_0239 So this weekend my neighborhood held a trash day for bigger items and furniture. I of course went around to see what was out and found a wicker chair and ottoman and a coffee table just on my street! I could see why they were out for the trash. The chair and ottoman needed cleaned and repainted and was missing a couple pieces. They aren’t perfect but the price was right so I took them and made them new-ish. Now I just need to find a cushion! The table I took because we’ve been wanting to get a coffee table, but in closer inspection I discovered that two of the rungs on the bottom layer are split and it’s a bit wobbly. Not really great for the living room but not as noticeable for an outdoor table. I love saving things and making them new!    

20140722-144135-52895749.jpg

Before

After!

After!

  name

Make Your Own Post Earrings

Hello, everyone, for my first DIY I thought I would do an easy one that started when I couldn’t find any post earrings that I wanted to wear for everyday wear.
Image

  I used empty post earrings from Hobby Lobby and got out the ole’ bag of nail polish.  Then I stuck the earrings in a ball of poly clay to keep them upright while they dried.  I got out my favorite colors and dripped a few drops getting enough on so that there was a dome of polish on the surface.  After it dried it still caved in a little in the middle but I don’t really mind the look.  The dark purple was my favorite so far.

After it dried it was flatter than I had wanted so I repeated this step a couple times  After I made the purple and blue pair I was pretty happy with the results so I tried something a little more challenging.  I took some green loose eye shadow and mixed in in with clear nail polish in this bottle cap with a toothpick. (you use what you have handy!) I then used an old paintbrush to dab it on the same way as the first two.

Image

(This looks like a face, I know!)

Here is the results:

Image Image